SMART IRRIGATION SYSTEM USING ARDUINO UNO
We have different- different hobbies like doing gym, reading books, singing, playing cricket etc. And doing that hobbies gets relaxed and feel well. One of those hobby is gardening or planting. Mostly like doing gardening or planting. Because gardening provides better health to us and provides good environment. Which always keep positive thinking to us. We have to give watering every day for that good growth. If at home there is no problem the tree, plant, flower, keeps getting water from time to time. If we are outside from the city and there is no one to water the tree, plant , flower from time to time. So there remains a problem. If the tree , plan not get water on time, then the tree or plant may die or damage. Solve this problem. In this project we are going to build a smart irrigation system. Where you grown tree, there the soil sensor's probes will be put inside the soil. The soil moisture sensor will detect dry soil and wet soil that of plant. If the soil goes to dry the sensor will detect and relay trough turn ON the water pump and when soil goes to wet then soil moisture sensor detected and relay through the turn OFF water pump.If you dont't know how can connection any load so click on. In this way the irrigation system will continue to water provide the trees or plants and flowers. Due to which the growth of tree, plants will remain good. Click on previous article.
WHAT IS SOIL MOISTURE SENSOR?
Soil moisture sensor an electronic sensor. Which is used in the irrigation system. Soil sensor measure the volumetric water content in the soil. sensor is low cost, less power consume and easy to interface to Arduino. Sensor operate to 3.3V to 5V DC power supply.
HOW SOIL MOISTURE SENSOR WORKS?
The working of soil moisture sensor is very simple. The soil sensor divides into two parts.
1.Circuits part
2.probes part
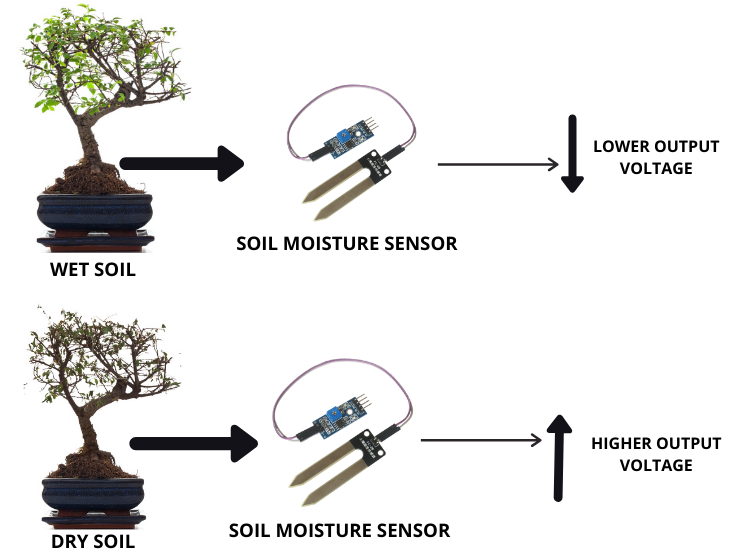
Probes:-Probes have fork shaped of two conductive layer. Which act as a variable resistor. Whose resistance varies according to the water content in the soil of plants or trees.
This resistance inversely propositional to the soil moisture.
If the more water in soil it means more conductivity then resistance is lower.
If the less water in soil it means less conductivity then resistance is higher.
Sensor Circuit:-Soil moisture sensor circuit provide an output voltage according to resistance and output is measured, we can be known soil level by A0 analog output pin and D0 digital output pin.
Soil sensor has a built-potentiometer to adjust the sensitivity of D0 or A0 output. You can set a threshold by using a potentiometer. When certain moisture level is reached the threshold value then D0 digital output LOW or HIGH. And Arduino reads output signal from the D0 output pin of soil moisture sensor.
When Arduino reads LOW signal (0V), then Arduino relay through turn ON pump.
When Arduino reads HIGH signal (5V), then Arduino relay through turn OFF pump.
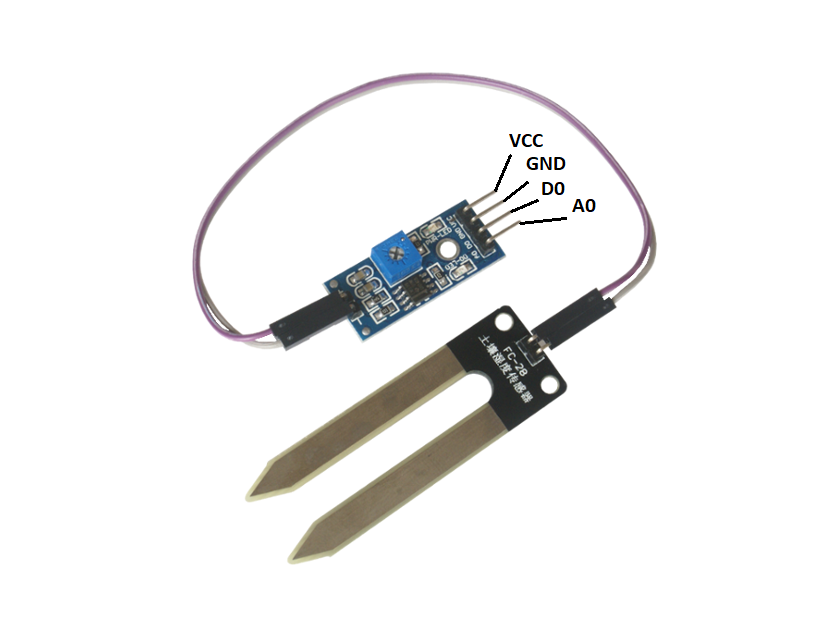
PINOUT OF SOIL MOISTURE SENSOR
It has four pins of the sensor.
VCC - 3.3V to 5V dc power supply provide to vcc pin of sensor.
GND - GND provide to GND pin.
A0 - Analog output (0 to 1023) value provide from the A0 pin of sensor.
D0 - Digital output value LOW or HIGH value provide from the D0 pin.
COMPONENT REQURED
- Arduino Uno
- Soil moisture sensor
- One channel SPDT 5v relay
- Water Pump
- Battery
- Some wire
SCHEMATICS DIAGRAM
You follow the schematics diagram.
CODE
int soil_sensor = 2;
int relay = 3;
int soil_value;
void setup()
{
Serial.begin(9600);
pinMode(soil_sensor, INPUT);
pinMode(relay, OUTPUT);
digitalWrite(relay, HIGH);
}
void loop()
{
soil_value = digitalRead(soil_sensor);
Serial.print(" Soil Value=");
Serial.println(soil_value);
if(soil_value == 1)
{
digitalWrite(relay, LOW);
Serial.print(" Soil is Dry");
}
else
{
digitalWrite(relay, HIGH);
Serial.print(" Soil is Wet");
}
delay(500);
}


0 Comments