
SMART BUNK BED CHILD MONITORING SYSTEM | BABY MONITORING SYSTEM BY ANDROID APPLICATION(PART-2)

This is a second part of project. We have already discussed about to 1st part of this project. If you did not read article of part-01. So click on link. We told all about the part-1. We told about to know all sensors. So today we are going to expand the project of part -1. Which is our second part (part-2). Before this, we saw in part-1 that all the types of sensors we had in our bunk bed , through which we were monitoring. All these sensors were connected to arduino board and the data that was received by all the different types of sensors used to send that the data through the microcontroller(atmega328) and the microcontroller used to turn on buzzer for alerts parents. All the data processes with wired. All sensors,buzzer and arduino communicate to each other only with wired. In this second part(part-2) of the project, we will transfer the data ,received by all the connected sensors through the arduino. Direct sensor's data transfer Arduino to android application of smartphone with wireless.
COMPONENT REQUIRED
1.)Arduino uno.
2.)Mq2 gas sensor.
3.)Wet sensor.
4.)Piezo electric sensor.
5.) HC-SR04 Ultrasonic sensor.
6.)DHT11 Temperature module.
7.)HC-05 Bluetooth module.
8.)12v, 1 amp power supply adapter.
9.)Plywood for frame(Bunk bed).
10.) Some wires.
ARDUINO UNO

Mq2 GAS SENSOR

Mq2 gas sensor is a type of sensor.Which detects Smoke or Gas in the air. This is made metal oxide semiconductor (MOS) . We know as Chemiresistor .When a smoke or gas comes into contact with gas sensor . The MOS material is heated then stars causing the resistance value change according to concentration of gas or smoke. And the resistance value level of sensor is changed depend up on the type of gases presents in the atmosphere of Mq2 sensor.
There are following types of gases detect by Mq2 Gas sensor
- LPG.
- Propane.
- Methane.
- Butane.
- CO.
- Alcohol.
- Hydrogen etc.
WET SENSOR OR SOIL MOISTURE SENSOR

Soil moisture sensor or wet sensor an electronic sensor. Which is used in the irrigation system or any wet or dry detect . Soil sensor measure the volumetric water content in the soil. sensor is low cost, less power consume and easy to interface to Arduino. Sensor operate to 3.3V to 5V DC power supply.
PIEZO ELECTRIC

A piezoelectric sensor is a device that uses the piezoelectric effect to measure changes in pressure, acceleration, temperature, strain, or force by converting them to an electrical charge. The prefix piezo- is Greek for 'press' or 'squeeze'.
ULTRASONIC SENSOR

The HC-SR04 Ultrasonic sensor distance is distance measuring sensor. This sensor uses sonar to determine distance to any object, It provide a some no-contact range detection with high accuracy. You can easy-to-use and low power consume and buy low cost ultrasonic use common in robotic. And other automation field. Ultrasonic range is detect object within 2 cm to 400 cm but sensor get better result within 10 cm to 250 cm.
There are Three sections of HC-SR04 ultrasonic sensor:-1.Transmitter 2.Receiver3.Circuit of HC-SR04DHT-11

DHT11 sensor module is a type of sensor. Which measures the temperature and humidity of the environment in single wire. It has a restive humidity sensor and NTC (Negative Temperature Coefficient) temperature sensor or Thermistor sensor and 8-bit microcontroller chip, that are providing cost effectiveness, anti-interfacing ability, excellent quality and also fast response. There is a 3 pin dht11 sensor and 4 pin dht11 sensor available in the market, so you can buy either of them. These are both same. 3 pin dht11 to 1. GND 2. VCC 3. Signal pin. And the 4 pin sensor has 1. GND 2. VCC 3. Signal pin 4. NC (no connection) pin. When you interface with arduino, only 3 pins of dht11 use GND, VCC and signal pins of dht11 sensor module. HC-05 Bluetooth Module

HC-05 Bluetooth module is a wireless module. It is a specially designed for wireless data transfer and receiver.
It has 6 pin1.)EN Pin.2.)TXD Pin.3.)RXD Pin.4.)VCC Pin(3.3v To 5v)5.)GND Pin.6.)State Pin.
 |


PIN OUT:-
HC-05 ARDUINO UNO
VCC +5VGND GNDTX RXRX TX
HC-05 ARDUINO UNO
VCC +5V
GND GND
TX RX
RX TX
HC-SRO4 ARDUINO UNO
VCC +5VGND GNDTRIG D2ECHO D3
MQ2 ARDUINO UNO
VCC +5VGND GNDDO D4
WET SENSOR ARDUINO UNO
VCC +5VGND GNDDO D5
BUZZER ARDUINO UNO+ D6GND GND
DHT-11 SENSOR ARDUINO UNO
BUZZER ARDUINO UNO
+ D6
GND GND
DHT-11 SENSOR ARDUINO UNO
VCC +5VGND GNDDO D7
PIEZO ELECTRIC ARDUINO UNO
+ A0 - GND
WORKING PROCEDURE
The working principle of this project is very simple. How do parents know if their child is in the bed of the children's bedroom without enter. You can easily monitor by the mobile app. All sensors live data transfer by Bluetooth to your mobile Bluetooth for witch you can easily monitor in app from anywhere. Bunk bed has attached 4 sensors hc-sro4 ultrasonic sensor,mq2 gas sensor, soil moisture or wet sensor and piezo electric sensor ,dh11 temperature sensor and buzzer. All these sensors are connected to arduino board and all sensors and arduino board operates by 5 volt dc power supply . When the children go to sleep on the bed or through the stair , the ultrasonic sensor detects the children and the data transfer Arduino's Bluetooth to mobile and show live status in app .it is detected . So that parents can easily know that their children are inside the bed or not. Whenever children come in the bed, it detects the piezo inside the bed due to electric pressure and sends a signal to the arduino and arduino send data through the hc-05 bt to your app as soon as it is detected. So this is how parents know that their on the bed. And when the child spills water in the bed or urinates suddenly while sleeping, so the wet sensor in the bed makes sensor sens and live status show your mobile app .so that the parents know that the bed is wet And changes the bed sheet in time so that infection can be easily avoided. And when there is a gas leakage due to some reason or burning of something than the gas sensor in the bunk bed detects then show data in app so that the parents know easily So this kind of smart bunk bed child monitoring system works. There is some processes for witch you can all sensors data see in your mobile app.

First of all the project's Bluetooth(hc-05) should be turned on when bluetooth is on then bluetooth continuously starts blinking. And as soon as the hc-05 bluetooth is connected to the bluetooth of our mobile hc-05's led blinking stop.
1.)We have to give dc power supply our project for witch hc-05 bluetooth provided 5v dc.
2.)Then after we have to go our mobile settings just click on settings then after will show Bluetooth icon just click on it.
3.)Then we have to on the bluetooth device. Off to On and after on bt then starts showing all available bluetooth devices in our around. We have to only find out hc-05 bluetooth. When we will get hc-05 bt of project then click on.
 4.)After click on then we have to pair hc-05 bluetooth so we have to put 1234 number and ok then successfully paired bt.
 5.)Then after we have to download apk file after downloaded apk file then click on and install apk file simply
 6.)After install app then open application of baby monitoring system.


After as soon as you open the application, you will get to see some interface like this. So right now you won't see any live status of sensors of bunk bed because mobile bluetooth is not yet connected to hc-05 bluetooth of project. So we have to connect the bluetooth for witch send data from arduino through in our mobile.


8.)So some data look like this when sens the sensors.


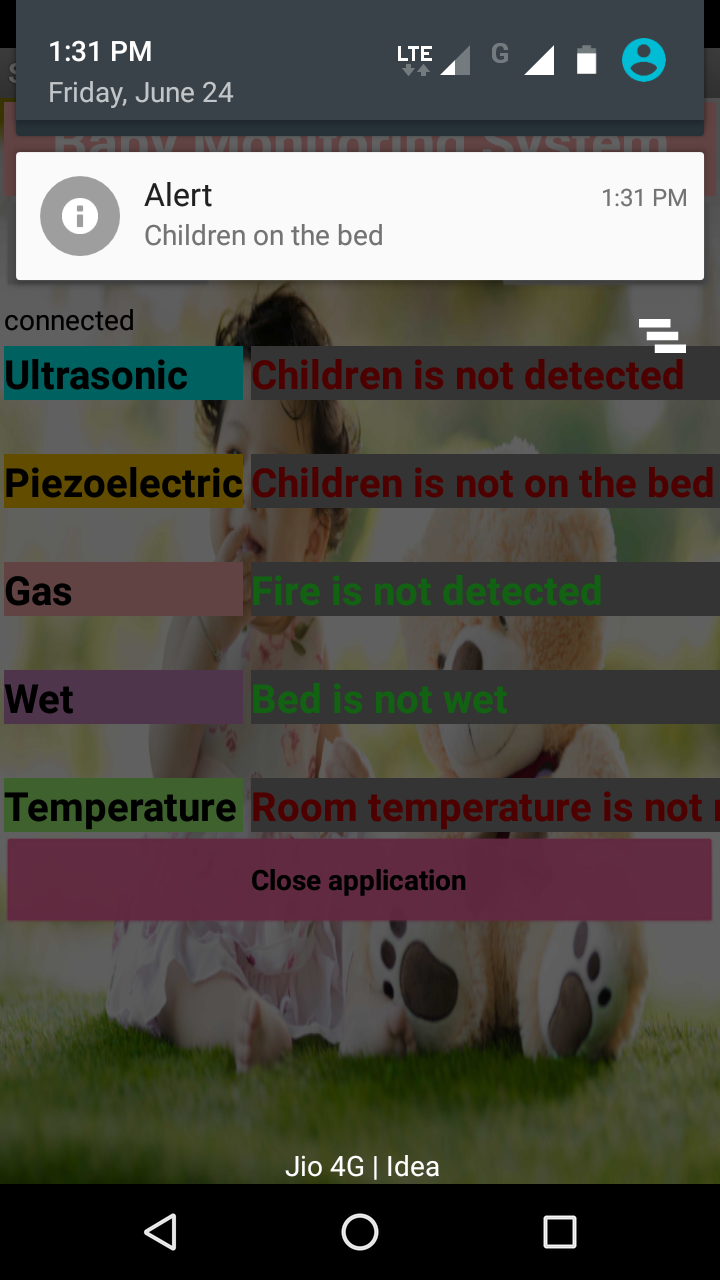


In this way show all sensor's data status in our mobile app.SCHEMATICS DIAGRAM


CODE
//ultrasonic sensor
int trigPin=2;
int echoPin=3;
int duration;
int distance;
//gas sensor
int mq2 =4;
int val1;
//piezo sensor
int piezo= A0;
int val2;
//wet sensor
int wet = 5;
int val3;
// Buzzer
int buzzer=6;
//Temperature sensor
#include "DHT.h"
#define DHTPIN 7 // Digital pin connected to the DHT sensor
#define DHTTYPE DHT11 // DHT 11
DHT dht(DHTPIN, DHTTYPE);
void setup()
{
// put your setup code here, to run once:
Serial.begin(9600);
dht.begin();
// Serial.println(F("DHTxx test!"));
pinMode(trigPin, OUTPUT);
pinMode(echoPin, INPUT);
pinMode(buzzer,OUTPUT);
pinMode(mq2,INPUT);
pinMode(piezo,INPUT);
pinMode(wet,INPUT);
}
void ultrasonicsensor()
{
digitalWrite(trigPin, HIGH);
digitalWrite(trigPin, LOW);
int duration = pulseIn(echoPin, HIGH);
int distance = (duration/2) / 29.1;
Serial.print(distance);
Serial.print("/");
}
void mq()
{
val1=digitalRead(mq2);
Serial.print(val1);
Serial.print("/");
}
void piezo_sensor()
{
val2=analogRead(piezo);
Serial.print(val2);
Serial.print("/");
}
void wet_sensor()
{
val3=digitalRead(wet);
// Serial.print("Wet=");
Serial.print(val3);
Serial.print("/");
}
void temperature()
{
// delay(2000);
// Reading temperature or humidity takes about 250 milliseconds!
// Sensor readings may also be up to 2 seconds 'old' (its a very slow sensor)
float h = dht.readHumidity();
// Read temperature as Celsius (the default)
float t = dht.readTemperature();
// Read temperature as Fahrenheit (isFahrenheit = true)
float f = dht.readTemperature(true);
// Check if any reads failed and exit early (to try again).
if (isnan(h) || isnan(t) || isnan(f)) {
Serial.println(F("Failed to read from DHT sensor!"));
return;
}
// Compute heat index in Fahrenheit (the default)
float hif = dht.computeHeatIndex(f, h);
// Compute heat index in Celsius (isFahreheit = false)
float hic = dht.computeHeatIndex(t, h, false);
// Serial.print(h);
Serial.print(t);
Serial.print("/");
delay(1000);
// Serial.print(f);
}
void loop() {
// put your main code here, to run repeatedly:
ultrasonicsensor();
//wet_sensor();
piezo_sensor();
mq();
wet_sensor();
temperature();
}


0 Comments